Modern Browsers
The five modern web browsers are Internet Explorer, Firefox, Safari, Chrome and Opera.
DashingD3js.com will focus on the web browsers that use WebKit.
WebKit is a layout engine software designed to allow web browsers to render web pages
WebKit powers the Apple Safari and Google Chrome browsers.
We will use Google Chrome for the rest of the sections for the Web Inspector Developer Tool.
More details below.
Much much later, we will get into cross-browser compatibility.
The web browser's main function is to display a web resource.
The browser requests the resource from the server and displays the resource in the browser window.
The resource can be HTML, images, PDFs, text, or other media.
The web browser requests a resource from the server using the Uniform Resource Identifier (URI) of the resource.
For most cases, the URI is actually a URL.
A URL is the Uniform Resource Location.
URL refers to location and URI refers to identity.
After the browser receives the requested resource it must interpret and display the resource.
The way a browser interprets and displays HTML and CSS files is specified in the HTML and CSS specifications.
HTML5 and CSS3 are specific HTML and CSS specifications.
HTML
The Hypertext Markup Language (HTML) resource is the main markup language for displaying web pages.
HTML elements are the building blocks of the HTML web page.
The elements consist of a pair of tags (starting and ending tags) and the textual or graphical content inside of the tags.
Inside of the tags, different attributes can be given.
The starting HTML webpage we will use is:
You can read more about HTML here =>HTML
CSS
The Cascading Style Sheet (CSS) resource is the style sheet language used for describing the presentation of the document.
The presentation includes both the look as well as the formatting.
CSS can be applied to HTML, XML, and most importantly for D3.js Scalable Vector Graphics (SVG).
CSS formatting can be applied to html elements as an attribute.
The "Style" part of the line is the style sheet language describing that the font-size should be 12 pixels.
When the CSS formatting is applied directly to the html element as an attribute, it is called "in-line css".
The are two other main ways to add CSS formatting to HTML elements.
One is to put it at the top of the HTML file (See lines #5 - #7).
The other way is to put it into a different file that the HTML code references (See line 5).
The examples and sections will show the CSS in a separate file.
This will makes the Web Inspector easier to use.
CSS works by attaching a rule to an HTML element.
Here, "p" is the HTML element the style sheet is selecting and the font-size is the rule that it is attaching.
You can read more about CSS here => CSS
JavaScript
JavaScript is a programming language used to give sophisticated functionality to webpages before, during and after they load. It can also be used for the server.
For D3.js purposes, we will use it to write functions to interface with the data and D3.js.
Much like CSS, JavaScript can be included in three main places in the HTML page:
Inline:
In the Body (note the starting and closing tags):
At the Head, in another file:
For our purposes, we will be including the Javascript we write in the body of the HTML document.
The D3.js javascript file will be in another file and referenced at the head of the document.
You can read more about JavaScript here =>JavaScript
Document Object Model (DOM)
Document Object Model (DOM) is a convention for representing and interacting with objects in HTML, XML, and XHTML documents.
The DOM is separated into three parts: Core, HTML, and XML.
The DOM allows programs and scripts to dynamically access and update the structure, content, and style of a document.
A DOM structured document has a DOM Tree which can be used to address, manipulate, and navigate the structure of the Document.
The structure of the DOM Tree is can be navigated in reference to relationships of its branches.
This gives us descendant, ancestor, as well as parent, child and sibling.
Thus we can specify a particular element in the DOM, look at the DOM tree, and select all of the elements above, below or along it easily.
For Example:
The p element has a parent => body
The p element has a sibling => input
The p element has a child => span
Using JavaScript, jQuery, and CSS we will later cover how to select many elements at the same time.
This allows us to access and update the structure, content, and style of the selected elements.
You can read more about the DOM here => Document Object Model (DOM)
Scalable Vector Graphics (SVG)
Scalable Vector Graphics (SVG) is a family of specifications for creating two-dimensional vector graphics.
Vector graphics are not created out of pixels.
Vector graphics are created with paths having a start and end point, as well as points, curves and angles in between.
Since Vector Graphics are not created out of pixels, they can be scaled up to larger or smaller sizes without losing image quality.
SVG images and their behaviors are defined in XML text files.
The XML text can be included in an HTML document.
This text means that images can be created and edited in a text editor.
Also, since the DOM includes XML as part of the DOM specification, we can use the DOM Tree to access and update the structure, content and style of SVG Images.
SVG comes with a basic set of shape elements:
- Rectangle
- Circle
- Ellipse
- Straight Line
- Polyline
- Polygon
Rectangle Example & Code:
Circle Example & Code:
Ellipse Example & Code:
Straight Line Example & Code:
Polyline Example & Code:
Polygon Example & Code:
From all of these examples, you can see the power of Scalable Vector Graphics (SVG).
We will use these basic shapes in many of our D3.js Data Visualizations.
Web Inspector
The Web Inspector comes with WebKit based browsers.
We will use Chrome's Web Inspector.
This is what it looks like:
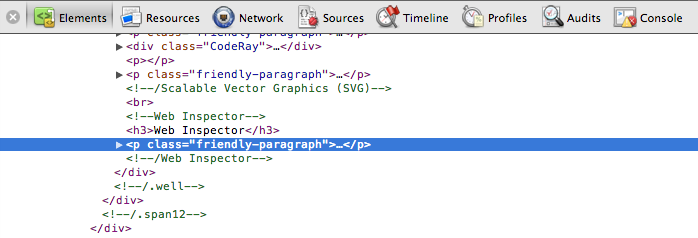
We use the Web Inspector to see the current state of the DOM.
We also use the Web Inspector to use the JavaSCript console for debugging and testing code.
Lastly, the Web Inspector also lets you highlight an element, right click on it, and then Inspect the Element:
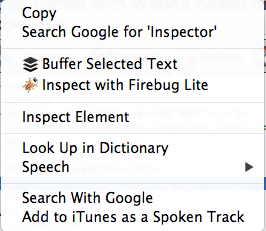
This allows you to see the DOM elements for the specific thing you highlighted on your screen.
You can read more about the WebKit Web Inspector Tools here =>